As a food enthusiast who revels in the art of quick and enjoyable cooking, I have a soft spot for desserts that come together effortlessly. Enter the cherry cheesecake lush dessert—a decadent delight that captures the essence of summer, even in the depths of winter. I can still remember the first time I made this dessert. It was a sunny afternoon, and I was hosting friends for dinner. I wanted dessert to be delightful yet simple, and this layered cherry cheesecake creation stole the show.
What is Cherry Cheesecake Lush Dessert?
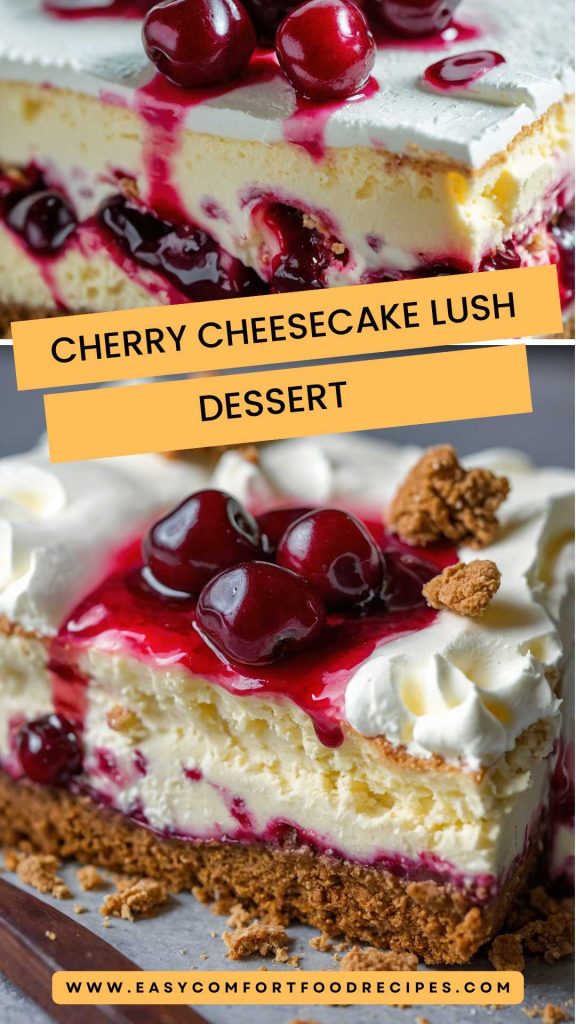
Imagine a dessert that combines the velvety richness of cheesecake with the freshness of cherries, all layered over a delicious graham cracker crust. The cherry cheesecake lush dessert is essentially a multi-layered treat. It features a creamy filling, a crunchy base, and a luscious cherry topping. This dessert is not only visually appealing but also offers a heavenly blend of textures. Each bite brings forth creamy, crunchy, and fruity flavors that leave you reaching for just one more slice.
Much like a classic cheesecake, this dessert is a crowd-pleaser. It's no surprise it has become a staple at potlucks, BBQs, and family gatherings. Its simplicity ensures that anyone, regardless of their baking experience, can whip it up with ease.
Why You'll Love This Cherry Cheesecake Lush Dessert
There are plenty of reasons to fall head over heels for this treat. For one, the preparation is incredibly simple. There’s no need for baking, which keeps the kitchen cool during those sizzling summer days. The dessert can be prepared ahead of time, letting the flavors meld beautifully in the fridge until you’re ready to impress your guests.
Additionally, the combination of flavors brings a memorable experience. The smooth cream cheese filling plays beautifully against the tartness of the cherry topping. The graham cracker crust adds just the right crunch to the softness of the filling. With layers upon layers of goodness, it’s a delightful treat that satisfies just about any sweet tooth.
Before you roll up your sleeves to create this delightful dessert, gather the following ingredients:
2 cups graham cracker crumbs (store-bought is fine)
1/2 cup unsalted butter, melted
8 oz cream cheese, softened to room temperature
1/2 cup powdered sugar, sifted to remove lumps
1 tsp pure vanilla extract
1/2 tsp almond extract (this enhances the nutty flavor)
1 tsp lemon zest (adds brightness)
16 oz frozen whipped topping, thawed and divided
1/3 cup toasted sliced almonds
2 (21 oz each) cans cherry pie filling
With these ingredients on hand, you're well on your way to making a cherry cheesecake lush dessert that will dazzle your taste buds.
Step-by-Step Instructions
Let’s dive into the nitty gritty of making your cherry cheesecake lush dessert.
Step 1: Prepare the Graham Cracker Crust
Start by combining the graham cracker crumbs with the melted butter in a large mixing bowl. Stir the mixture until the crumbs are fully coated in butter. It should look like wet sand. Next, press this mixture firmly into the bottom of a prepared 9x13 inch baking dish. You’ll want to pack it tightly for that perfect crunch you crave. Once that’s done, set aside while we move to the next layer.
Step 2: Make the Cream Cheese Filling
In another mixing bowl, beat the softened cream cheese and powdered sugar together until it becomes smooth and creamy. This is where you can add the vanilla extract, almond extract, and lemon zest. These flavors will help create a more complex filling. Once combined, fold in about two cups of the thawed whipped topping. This will help lighten the mixture, giving it an airy texture. Set this delightful mixture aside—resist the urge to eat it with a spoon!
Step 3: Layer the Cream Cheese Mixture
Spread the cream cheese mixture evenly over the prepared graham cracker crust. Use a spatula to smooth it out carefully, ensuring it reaches all corners of the dish. The mixture should be thick enough to hold its shape without slipping off. After you’ve spread it, pop it into the fridge to chill for about 30 minutes. This allows the filling to set.
Step 4: Add the Cherry Topping
Once the filling has had time to chill, it’s time for the cherries! Open both cans of cherry pie filling and carefully spread them over the cream cheese layer. Use a spoon to evenly distribute the cherries so that every bite contains a bit of that fruity goodness. The vibrant color of cherries adds a stunning aesthetic—just look at that!
Step 5: Top with Whipped Topping
Finally, spread the remaining whipped topping over the cherry layer. You can create swirls or leave it smooth, depending on your preference. For a delightful finishing touch, sprinkle the toasted almonds evenly over the top. Not only does this add flavor, but it gives the dessert an enticing crunch.
Step 6: Chill and Serve
Once everything is assembled, cover your dish with plastic wrap or aluminum foil. Chill for at least two hours, but overnight is even better. This waiting period allows all the flavors to mingle and creates a dessert that’s refreshing and delightful. When you’re ready to serve, cut into squares, and get ready for the compliments to roll in.
Tips & Tricks
Here are a few tips to help you make this dessert even more amazing:
Use Quality Ingredients: The flavor of your dessert is only as good as the ingredients you use. Make sure your cream cheese and whipped topping are fresh.
Experiment with Toppings: If cherry isn’t your thing, consider using blueberries, strawberries, or even mixed berries for a different spin.
Make it a Day Ahead: This dessert tastes even better the next day. Making it ahead ensures that all the flavors blend seamlessly.
Adjust Sweetness: Taste as you go. The sweetness of the cherry pie filling can vary, so adjust the powdered sugar in the cream cheese layer according to your preference.
Garnish Creatively: Consider adding fresh fruit or mint leaves as a garnish immediately before serving for extra freshness.
Nutrition Information
Before you dig in, it’s always wise to consider the nutritional aspect. Each serving of cherry cheesecake lush dessert contains approximately:
This dessert can certainly be enjoyed in moderation, especially when you want a sweet treat to celebrate a special occasion.
Can I Store Cherry Cheesecake Lush Dessert?
Absolutely! This dessert stores beautifully in the refrigerator. Cover it with plastic wrap or aluminum foil to keep it fresh. It can last for about 3 to 5 days when stored properly. Just keep in mind that the longer it sits, the softer the crust may become due to the moisture from the filling.
What Can I Serve with Cherry Cheesecake Lush Dessert?
This dessert can stand alone, but here are some ideas for pairing:
Coffee or Tea: A warm brew complements the sweetness beautifully.
Ice Cream: A scoop of vanilla or even cherry ice cream can take dessert to the next level.
Fresh Mint Leaves: Adding a sprig of mint can enhance presentation and add a refreshing taste.
Additional Berries: Serve a small bowl of mixed berries alongside to add a fresh contrast.
Whipped Cream: Who says you can have too much whipped cream? A dollop on top never hurts.
Variations
If you’re feeling adventurous, consider these five variations:
Chocolate Cherry Lush: Incorporate chocolate pudding instead of cream cheese filling. Add crushed chocolate cookies to the crust for an added flavor twist.
Caramel Swirl Cherry Lush: Drizzle caramel sauce over the cream cheese layer and mix it lightly before adding the cherry topping for that sweet surprise.
Nutty Variations: Add crushed pecans or walnuts to the crust for a unique crunch and a different flavor profile.
Fruit Twist: Swap out the cherry pie filling for other flavors like blueberry or raspberry for a completely different dessert experience.
Vegan Cherry Lush: Use plant-based cream cheese and whipped topping to create a vegan-friendly version without sacrificing taste.
Conclusion
The cherry cheesecake lush dessert is a celebration of flavors and textures that anyone can prepare. With delectable layers and the perfect balance of sweetness, it’s surely a hit for any gathering. It marries creaminess with a crisp crust and a fruity topping, offering a little bit of everything in each bite.
As a food lover, I find joy in sharing delightful recipes that make cooking and entertaining more enjoyable. This cherry cheesecake lush dessert is one of those recipes—I encourage you to give it a try. So the next time you find yourself looking for a crowd-pleasing dessert, remember this layered treasure. It’s bound to bring smiles and satisfied sighs to the table. Enjoy making it, sharing it, and of course, savoring every delicious bite!
Imagine a dessert that combines the velvety richness of cheesecake with the freshness of cherries, all layered over a delicious graham cracker crust. The cherry cheesecake lush dessert is essentially a multi-layered treat. It features a creamy filling, a crunchy base, and a luscious cherry topping. This dessert is not only visually appealing but also offers a heavenly blend of textures. Each bite brings forth creamy, crunchy, and fruity flavors that leave you reaching for just one more slice.
Much like a classic cheesecake, this dessert is a crowd-pleaser. It's no surprise it has become a staple at potlucks, BBQs, and family gatherings. Its simplicity ensures that anyone, regardless of their baking experience, can whip it up with ease.
Ingredients
2cups graham cracker crumbs (store-bought is fine)
1/2cup unsalted butter, melted
8oz cream cheese, softened to room temperature
1/2cup powdered sugar, sifted to remove lumps
1tsp pure vanilla extract
1/2tsp almond extract (this enhances the nutty flavor)
1tsp lemon zest (adds brightness)
16oz frozen whipped topping, thawed and divided
1/3cup toasted sliced almonds
2(21 oz each)
Instructions
1
Let’s dive into the nitty gritty of making your cherry cheesecake lush dessert.
Step 1: Prepare the Graham Cracker Crust
2
Start by combining the graham cracker crumbs with the melted butter in a large mixing bowl. Stir the mixture until the crumbs are fully coated in butter. It should look like wet sand. Next, press this mixture firmly into the bottom of a prepared 9x13 inch baking dish. You’ll want to pack it tightly for that perfect crunch you crave. Once that’s done, set aside while we move to the next layer.
Step 2: Make the Cream Cheese Filling
3
In another mixing bowl, beat the softened cream cheese and powdered sugar together until it becomes smooth and creamy. This is where you can add the vanilla extract, almond extract, and lemon zest. These flavors will help create a more complex filling. Once combined, fold in about two cups of the thawed whipped topping. This will help lighten the mixture, giving it an airy texture. Set this delightful mixture aside—resist the urge to eat it with a spoon!
Step 3: Layer the Cream Cheese Mixture
4
Spread the cream cheese mixture evenly over the prepared graham cracker crust. Use a spatula to smooth it out carefully, ensuring it reaches all corners of the dish. The mixture should be thick enough to hold its shape without slipping off. After you’ve spread it, pop it into the fridge to chill for about 30 minutes. This allows the filling to set.
Step 4: Add the Cherry Topping
5
Once the filling has had time to chill, it’s time for the cherries! Open both cans of cherry pie filling and carefully spread them over the cream cheese layer. Use a spoon to evenly distribute the cherries so that every bite contains a bit of that fruity goodness. The vibrant color of cherries adds a stunning aesthetic—just look at that!
Step 5: Top with Whipped Topping
6
Finally, spread the remaining whipped topping over the cherry layer. You can create swirls or leave it smooth, depending on your preference. For a delightful finishing touch, sprinkle the toasted almonds evenly over the top. Not only does this add flavor, but it gives the dessert an enticing crunch.
Step 6: Chill and Serve
7
Once everything is assembled, cover your dish with plastic wrap or aluminum foil. Chill for at least two hours, but overnight is even better. This waiting period allows all the flavors to mingle and creates a dessert that’s refreshing and delightful. When you’re ready to serve, cut into squares, and get ready for the compliments to roll in.
Nutrition Facts
Servings 12
Amount Per Serving
Calories2610kcal
% Daily Value *
Total Fat17.3g27%
Saturated Fat11.3g57%
Cholesterol28mg10%
Sodium499mg21%
Total Carbohydrate599g200%
Dietary Fiber13g52%
Sugars14g
Protein11g22%
* Percent Daily Values are based on a 2,000 calorie diet. Your daily value may be higher or lower depending on your calorie needs.
Note
Here are a few tips to help you make this dessert even more amazing:
Use Quality Ingredients: The flavor of your dessert is only as good as the ingredients you use. Make sure your cream cheese and whipped topping are fresh.
Experiment with Toppings: If cherry isn’t your thing, consider using blueberries, strawberries, or even mixed berries for a different spin.
Make it a Day Ahead: This dessert tastes even better the next day. Making it ahead ensures that all the flavors blend seamlessly.
Adjust Sweetness: Taste as you go. The sweetness of the cherry pie filling can vary, so adjust the powdered sugar in the cream cheese layer according to your preference.
Garnish Creatively: Consider adding fresh fruit or mint leaves as a garnish immediately before serving for extra freshness.
Kathleen Looney is a Texas-based registered dietitian and the creator of Easy Comfort Food Recipes, where she shares simple, hearty dishes that bring warmth and joy to the table. Combining her love for Southern classics and Tex-Mex flavors, Kathleen creates approachable recipes that balance indulgence and nutrition. Her passion lies in helping home cooks prepare comforting, soul-satisfying meals that nourish both body and spirit.