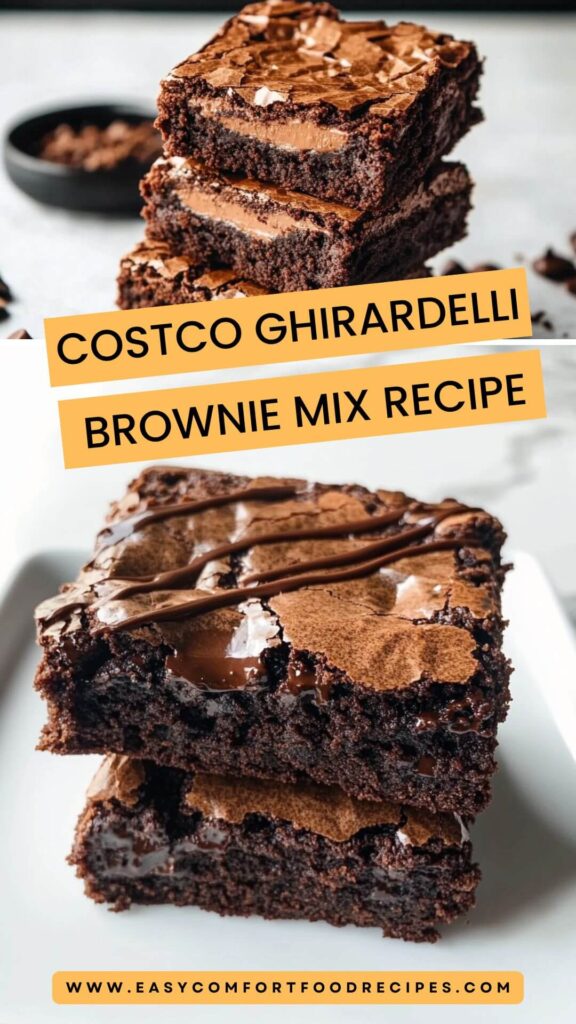
When my friends hear about my Costco trips, they often roll their eyes, half-jokingly referring to my love for all things bulk. But I assure you, there’s a sweet gem amid those enormous carts and endless aisles – Ghirardelli Brownie Mix!
Let me tell you about my adventure with this delightful mix. I’m not just sharing a recipe; I’m inviting you into the world of gooey chocolatey goodness that you can whip up in no time.

What is Costco Ghirardelli Brownie Mix?
Simply put, it’s a convenient package of brownie mix that simplifies your dessert-making while still delivering outstanding taste. Here’s something that might surprise you: not all brownie mixes are created equal.
The Ghirardelli brand is known for its high-quality chocolate, and this mix is no exception. In every scoop from that bag, you’ll find rich cocoa and chocolate pieces that elevate your brownies to a decadent delight.
But let’s be clear: we’re not just talking about average brownies here. I’ve found that the Ghirardelli Brownie Mix holds a secret ingredient—carefully sourced, real chocolate.
This gives the brownies a texture and flavor that just can’t be matched. While other mixes fade into the background, this one steps into the spotlight.
Why You’ll Love This Costco Ghirardelli Brownie Mix Recipe
Why do I rave about this recipe? It’s so simple yet full of flavor. I love it because:
- Time-Saving: You don’t have to measure flour, sugar, or cocoa. Everything is mixed for you.
- Proven Success: Each time, my friends rave about how incredible these brownies taste.
- Customization: You can add a personal touch to the mix. The possibilities are endless!
- Kid-Friendly: Even my picky eater niece devours these brownies.
- Quick Cleanup: Fewer dishes mean more time enjoying dessert!
The Ingredients
Before we dive into our chocolatey escapade, here’s what you’ll need. Most are pantry staples, but you may have to pick up that Ghirardelli Brownie Mix next time you’re at Costco:
- 1 large egg
- 1/4 cup purified water
- 1/3 cup canola oil
- 1 teaspoon vanilla extract
- 18-ounce package of Ghirardelli Brownie Mix (any flavor)

Step-by-Step Instructions
Step 1: Preheat the Oven
First things first: preheat your oven to 350°F. I usually set a timer to ensure my oven reaches the right temperature while I prepare everything.
Step 2: Prepare the Baking Pan
Grab a 9×9-inch baking pan. You have the option to grease it lightly with oil or spray it with nonstick cooking spray. If you like easier cleanup, consider lining the bottom and sides with parchment paper. Trust me; it saves a lot of hassle!
Step 3: Combine Wet Ingredients
In a mixing bowl, crack that large egg open. Add 1/4 cup of purified water and 1/3 cup of canola oil. Then, pour in a teaspoon of vanilla extract. Whisk them together until the mixture becomes smooth and slightly frothy. This process brings a little air into the mix, making the brownies nice and fluffy.
Step 4: Incorporate the Brownie Mix
Next, dump the entire 18-ounce package of Ghirardelli Brownie Mix into your wet mixture. Using a spatula or wooden spoon, stir gently. You want to combine the ingredients without overmixing. A few lumps are completely fine; they will bake away.
Step 5: Pour and Spread
Once the batter comes together, transfer it into your prepped baking pan. Pour it in and use the spatula to spread it evenly. This ensures that every corner gets that rich chocolate goodness!
Step 6: Bake!
Pop the pan into your preheated oven and bake for 28-30 minutes. The time varies slightly depending on how thick your batter is and the oven you’re using. Keep an eye on it! A toothpick inserted in the center should come out with a few moist crumbs—nothing wet or gooey should cling to it.
Step 7: Cool Down
Once they’re out of the oven, let the brownies cool in the pan for about 10 minutes. Then lift them out (if you used parchment) to cool completely on a wire rack. Patience is key here. Those warm brownies can be tempting, but they’ll be gooey and hard to cut if you dive in too soon.
Tips & Tricks
- Use high-quality chocolate chips: For an extra chocolatey kick, add 1 cup of chocolate chips. You’ll be glad you did!
- Mix-ins: Don’t hesitate to toss in nuts, coconut, or caramel bits. It’s all about what you enjoy.
- Storage: If there’s any left (which is rare), keep them in an airtight container to maintain moisture.
- Serving suggestion: A big scoop of vanilla ice cream on a warm brownie? It’s bliss on a plate!
- Great for gifting: Cut them into squares, place in a decorative box, and you have a thoughtful gift for neighbors or friends.
Can I Store Costco Ghirardelli Brownie Mix?
Absolutely! If you’re not baking immediately, you can store the unopened brownie mix in a cool, dry place. Keep it away from moisture for the best results. Once you’ve baked, leftover brownies can last up to 4-5 days at room temperature. Just remember, if you see them lasting that long, you may want to question your baking skills!
What Can I Serve with Costco Ghirardelli Brownie Mix?
A few ideas that complement brownies splendidly include:
- Vanilla ice cream: The classic pairing. Warm brownie and cold ice cream? Heaven!
- Fresh berries: Strawberries, raspberries, or blueberries add a splash of color and freshness.
- Chocolate sauce: Drizzle some over the top for that decadence factor.
- Caramel sauce: A sweet and salty topping for an elevated flavor experience.
- Whipped cream: Light and fluffy, perfect for dolloping on top of your brownies.
Variations
Now let’s get creative! Here are five variations on this trusty Ghirardelli brownie mix that will make dessert time even more exciting.
1. Brownie Sundae: Bake the brownies, let them cool, cut them into squares, and then layer them in a glass with a scoop of ice cream, chocolate syrup, and whipped cream. It’s a delightful twist that transforms them into a dessert extravaganza.
2. S’mores Brownies: Add a layer of graham cracker crumbs and mini marshmallows on top of the brownie batter before baking. Once out of the oven, you can toast the marshmallows quickly with a kitchen torch for an extra treat!
3. Mint Chocolate Brownies: Stir in 1 teaspoon of mint extract into your wet mixture and top the brownies with crushed mint candies or thin mints before baking. A refreshing twist on classic brownies.
4. Peanut Butter Swirl: After transferring the brownie batter to the pan, drop spoonfuls of creamy peanut butter over the surface. Use a knife to swirl it gently, creating beautiful patterns and a delicious peanut butter flavor.
5. Espresso Enhancement: Add 1 tablespoon of instant espresso powder to the mix for a mocha flavor. The coffee will amplify the chocolate taste and delight anyone who enjoys a touch of caffeine.

Conclusion
The Costco Ghirardelli Brownie Mix has become a staple in my kitchen. It combines convenience, taste, and versatility.
Whether you’re celebrating or simply indulging, these brownies never disappoint. From the first stir to the last crumb, this recipe introduces joy to baking and sharing delightful treats with friends and family.
So, fire up that oven, grab that mix, and get ready for a chocolatey journey that will have everyone asking for seconds! Happy baking!
You’ll also like the following recipes!
- Hot Apple Pie Dip Copycat Recipe
- How to Make Mcdonald’s Hot Apple Pie
- Best Cinnamon Red Hot Apple Pie Recipe

Costco Ghirardelli Brownie Mix Recipe – Easy Comfort Food Recipes
Description
When my friends hear about my Costco trips, they often roll their eyes, half-jokingly referring to my love for all things bulk. But I assure you, there’s a sweet gem amid those enormous carts and endless aisles – Ghirardelli Brownie Mix!
Let me tell you about my adventure with this delightful mix. I’m not just sharing a recipe; I'm inviting you into the world of gooey chocolatey goodness that you can whip up in no time.
Ingredients
Instructions
Step 1: Preheat the Oven
-
First things first: preheat your oven to 350°F. I usually set a timer to ensure my oven reaches the right temperature while I prepare everything.
Step 2: Prepare the Baking Pan
-
Grab a 9x9-inch baking pan. You have the option to grease it lightly with oil or spray it with nonstick cooking spray. If you like easier cleanup, consider lining the bottom and sides with parchment paper. Trust me; it saves a lot of hassle!
Step 3: Combine Wet Ingredients
-
In a mixing bowl, crack that large egg open. Add 1/4 cup of purified water and 1/3 cup of canola oil. Then, pour in a teaspoon of vanilla extract. Whisk them together until the mixture becomes smooth and slightly frothy. This process brings a little air into the mix, making the brownies nice and fluffy.
Step 4: Incorporate the Brownie Mix
-
Next, dump the entire 18-ounce package of Ghirardelli Brownie Mix into your wet mixture. Using a spatula or wooden spoon, stir gently. You want to combine the ingredients without overmixing. A few lumps are completely fine; they will bake away.
Step 5: Pour and Spread
-
Once the batter comes together, transfer it into your prepped baking pan. Pour it in and use the spatula to spread it evenly. This ensures that every corner gets that rich chocolate goodness!
Step 6: Bake!
-
Pop the pan into your preheated oven and bake for 28-30 minutes. The time varies slightly depending on how thick your batter is and the oven you’re using. Keep an eye on it! A toothpick inserted in the center should come out with a few moist crumbs—nothing wet or gooey should cling to it.
Step 7: Cool Down
-
Once they’re out of the oven, let the brownies cool in the pan for about 10 minutes. Then lift them out (if you used parchment) to cool completely on a wire rack. Patience is key here. Those warm brownies can be tempting, but they’ll be gooey and hard to cut if you dive in too soon.
Nutrition Facts
Servings 9
- Amount Per Serving
- Calories 128kcal
- % Daily Value *
- Total Fat 7.2g12%
- Saturated Fat 2.1g11%
- Cholesterol 8mg3%
- Sodium 412mg18%
- Total Carbohydrate 13g5%
- Dietary Fiber 1g4%
- Protein 2g4%
* Percent Daily Values are based on a 2,000 calorie diet. Your daily value may be higher or lower depending on your calorie needs.
Note
- Use high-quality chocolate chips: For an extra chocolatey kick, add 1 cup of chocolate chips. You'll be glad you did!
- Mix-ins: Don’t hesitate to toss in nuts, coconut, or caramel bits. It’s all about what you enjoy.
- Storage: If there's any left (which is rare), keep them in an airtight container to maintain moisture.
- Serving suggestion: A big scoop of vanilla ice cream on a warm brownie? It’s bliss on a plate!
- Great for gifting: Cut them into squares, place in a decorative box, and you have a thoughtful gift for neighbors or friends.